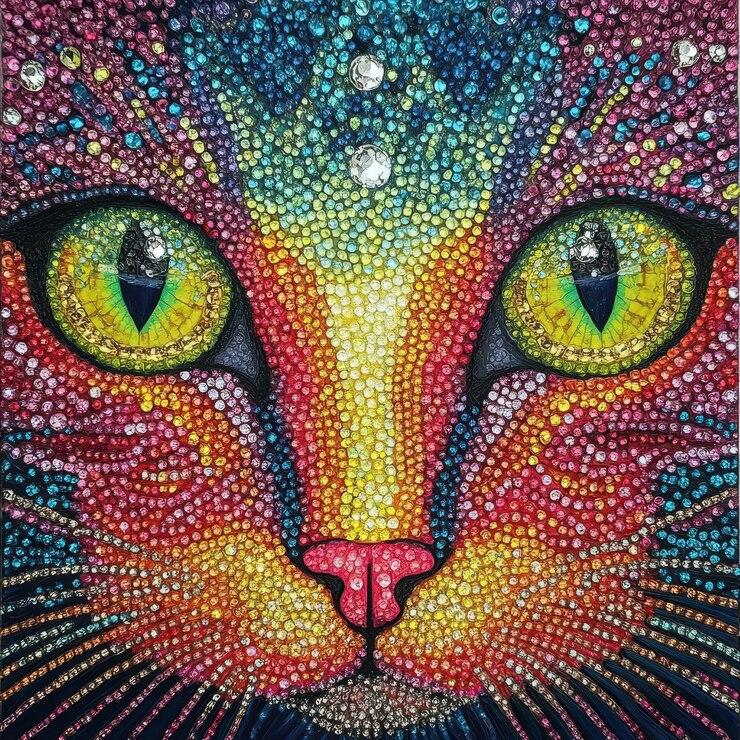
Full drill diamond painting is worth a try if you want a relaxing, screen-free hobby that produces a genuinely eye-catching finished piece. In a full drill kit, every part of the canvas is covered with tiny resin “drills”, so the result sparkles edge to edge with no printed gaps. It takes longer than a partial drill kit, but you need no artistic skill, just patience, a well-lit table and a little organisation.
This guide explains what full drill means, how round and square drills differ, what a kit contains, how to complete one step by step, and how to avoid the mistakes that frustrate most beginners.
What is full drill diamond painting?
Diamond painting is a craft that sits somewhere between cross-stitch and mosaic. You get an adhesive canvas printed with a grid of symbols, a set of colour-coded resin drills and a pen-like tool to pick them up. Each symbol matches a drill colour on the legend, and you press the right drill onto each square until the picture is complete.
In a full drill kit, the whole canvas is covered. In a partial drill kit, only the main subject is covered and the background is printed. That difference changes both the experience and the finished look.
| Feature | Full drill | Partial drill |
|---|---|---|
| Coverage | 100% of the canvas | Selected areas only |
| Time needed | Longer | Shorter |
| Finished look | Even sparkle, more depth and detail | Contrast between shiny and flat areas |
| Number of colours | Usually more | Usually fewer |
| Best for | Display pieces, longer projects | Quick projects, trying the hobby |
Round or square drills?
Full drill kits come with either round or square drills, and the choice affects both the process and the result.
- Round drills are more forgiving. They are quicker to place, do not need precise alignment, and give a softer, glittery finish. Most beginners start here.
- Square drills fit edge to edge for a crisper, more mosaic-like finish with fewer gaps. They take a little more care to line up, but many experienced crafters prefer the result.
- Special drills, such as AB (aurora borealis) drills with an iridescent coating, or glow-in-the-dark drills, appear in some kits to add highlights.
If you are torn, think about how you like to work. If you want a relaxed, flowing session, choose round. If you enjoy precision and a crisp grid that you can straighten as you go, choose square.
What comes in a kit, and what is worth adding
| Usually included | Useful extras |
|---|---|
| Printed adhesive canvas with legend | LED light pad to see symbols clearly |
| Bagged, colour-coded drills | Storage box with labelled compartments |
| Drill pen and wax pad | Multi-placer tips to place several drills at once |
| Drill tray | Extra trays so you can work with several colours |
| Tweezers (sometimes) | Roller for pressing drills down, and a sealant |
You do not need every extra on day one. A labelled storage box and a decent light make the biggest difference; multi-placers and extra trays are worth buying once you know you enjoy the hobby.
How a full drill kit works: from box to finished piece
1. Unpack and check everything
Check the canvas, drills, pen, wax and tray are all there, and that the number of drill bags matches the legend. If the canvas is creased from packaging, lay it flat under heavy books for a day or two. Avoid ironing unless the seller says it is safe, because heat can damage the adhesive.
2. Organise the drills
Each bag is labelled with a colour code, often matching DMC thread numbers. Transfer the drills into a labelled storage box or small containers, noting the symbol for each. This feels slow, but it saves a lot of time and frustration later, particularly on full drill kits with many similar shades.
3. Learn the legend
The legend down the side of the canvas matches symbols to colour codes. Similar colours can have similar symbols, so double-check before you begin a new area. Some crafters highlight each symbol on the legend once that colour is finished.
4. Peel back a small section at a time
Only uncover the part you are working on, folding or cutting the protective film back in strips. This keeps the rest of the adhesive clean and sticky.
5. Wax the pen and place the drills
Press the pen tip into the wax, pick up a drill from the tray, and press it onto the matching symbol. Common approaches are working one colour at a time across a section, or completing small blocks one at a time. Try both and see which you find more relaxing.
6. Press, seal and frame
When the last drill is placed, cover the canvas with the film or baking paper and roll it firmly to set every drill. A clear sealant is optional but helps prevent drills popping off and makes dusting easier. Finally, frame it like a poster, mount it on a stretcher frame, or use a ready-made diamond painting frame.

Why full drill diamond painting is worth it
There are faster crafts, so why do so many people choose full drill diamond painting? It is less about speed and more about what happens while you are doing it, and what you have at the end.
- A calming routine: the repetitive, focused action of placing drills is something many crafters describe as meditative, a way to switch off from screens and busy thoughts.
- Visible progress: every session leaves a patch of finished, sparkling canvas, which makes it easy to keep going.
- No artistic skill needed: the design is already mapped out, so anyone who can follow a chart can get a great result.
- A display-ready result: the all-over shimmer gives more depth and detail than a partial kit, so the finished piece genuinely looks like wall art.
- Social or solo: it is easy to do while listening to a podcast, chatting with family or at a craft club, and it suits people who enjoy quieter pastimes. If that sounds like you, our list of activities for introverts has more ideas.
Choosing your first kit
- Size: start with a small to medium canvas, roughly 30 x 40 cm, so you can finish in a few weeks rather than months.
- Colours: designs with fewer, clearly different colours are easier. Large areas of very dark or near-identical shades are harder, especially in low light.
- Drill shape: round drills are more forgiving for a first project.
- Quality: look for clear symbol printing, strong adhesive, a full set of drills with spares, and a seller that replaces missing colours.
- Personal kits: you can also have your own photo turned into a kit. A service like All Custom Diamond Painting converts a picture of a pet, a wedding or a favourite place into a full drill canvas, which makes a thoughtful handmade gift. Pick a sharp, well-lit photo with a clear subject for the best result.
For a custom photo kit, bear in mind that fine details such as small faces in a group shot can get lost at smaller canvas sizes. A close-up of one or two subjects, or choosing a larger canvas, usually gives a more recognisable picture.
Setting up a comfortable workspace
Because full drill projects run over many sessions, a comfortable setup makes a real difference. Work at a table rather than on your lap, with a chair that supports your back, and take short breaks to rest your eyes and stretch your hands and shoulders. Daylight or a daylight-balanced lamp shows colours most accurately.
If you cannot leave the project out, work on a large board or tray that you can lift away with the canvas and drills in place. Keep drinks well away from the canvas, and keep curious pets and small children away from loose drills, which are small enough to be a choking hazard.
Troubleshooting common problems
| Problem | Likely cause | What to try |
|---|---|---|
| Drills will not stick | Dust, hair or fingerprints on the adhesive | Clean gently with a lint-free cloth or a lint roller, and keep the film over unworked areas |
| Pen will not pick up drills | Wax worn away or clogged | Press the tip into fresh wax; replace the wax pad if it has dried out |
| Running short of a colour | Kit packed too few, or drills lost | Contact the seller with the colour code; many replace missing drills |
| Rows look wavy | Drills placed without straightening | Nudge them into line with a ruler before rolling |
| Canvas will not lie flat | Creases from rolling in the post | Weigh down under heavy books for a day or two |
Common beginner mistakes
- Peeling off all the film at once, which lets dust and pet hair ruin the adhesive.
- Mixing up similar colours by not labelling storage.
- Working in poor light, which strains your eyes and causes mistakes. A light pad or good desk lamp helps a lot.
- Not straightening rows as you go, especially with square drills. Nudge them into line with the edge of the tray or a ruler before they set.
- Leaving the canvas uncovered between sessions. Lay the film back over it or cover with baking paper.
A hobby like this comes with lots of small parts, so it helps to give it a home. Our guide to home organisation for DIY and hobbies has ideas for keeping craft supplies tidy. For more hobby and home inspiration, browse our Lifestyle category.
Bottom line
Full drill diamond painting is a slow, absorbing hobby with a striking result. Start with a small or medium round-drill kit, organise your drills before you begin, work in good light and uncover the canvas one section at a time. Finish one project that way and you will know whether to move on to square drills, bigger canvases or a custom kit from your own photo.
Frequently asked questions
Is full drill diamond painting good for beginners?
Yes. It needs no artistic skill. Start with a small or medium canvas with round drills and a design that does not have large dark areas.
How long does a full drill diamond painting take?
It depends on the size, drill shape and how often you work on it. A small canvas might take days to a couple of weeks, while large pieces can take months.
Are round or square drills better?
Round drills are quicker and more forgiving, so they suit beginners. Square drills sit edge to edge for a crisper, fuller finish but need more careful alignment.
Do I need to seal a diamond painting?
It is optional. Rolling the finished canvas firmly is often enough, but a clear sealant helps stop drills falling off and makes the piece easier to keep clean.
Can I turn my own photo into a diamond painting?
Yes. Custom kit services convert your photo into a printed canvas with matching drills. Clear, well-lit photos with a simple background give the best results.