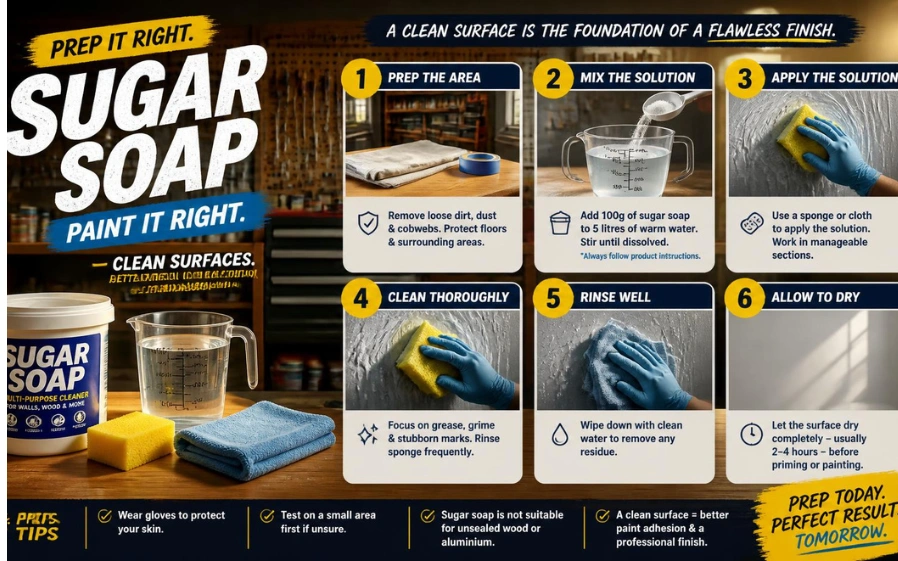
Sugar soap is a strong household cleaner best known for preparing walls, woodwork, and other suitable surfaces before decorating. It cuts through grease, grime, fingerprints, smoke residue, and dirt that may prevent a new coating from bonding properly. For UK homeowners planning to paint or wallpaper, it can make surface preparation much easier when it is used according to the product label.
| Quick guide | What to know |
| Main purpose | Cleaning and degreasing before painting or decorating |
| Common forms | Concentrated liquid, ready-to-use spray, powder, and wipes |
| Useful on | Suitable painted walls, paintwork, tiles, doors, skirting, and selected hard surfaces |
| Main safety step | Wear gloves and protect your eyes from splashes. |
| Before painting | Rinse when the product requires it and let the surface dry fully. |
| Avoid | Unsealed timber, delicate finishes, fabrics, electronics, or uncertain surfaces without checking first |
| Best practice | Read the label and patch-test an inconspicuous area. |
Used mainly before decorating, this alkaline cleaner removes grease, grime, smoke residue, and other contaminants that can interfere with a new finish. Dilute it according to the label, wash the appropriate surface, rinse when directed, and allow everything to dry fully. Wear gloves, prevent splashes, and test uncertain finishes first.
Key Takeaways
- Use it mainly for degreasing and cleaning suitable surfaces before decorating.
- Follow the dilution instructions on your specific bottle, box, spray, or wipes.
- Do not assume every formulation has the same ingredients or rinsing requirements.
- Wear gloves and avoid getting the cleaner in your eyes.
- Let walls dry completely before applying primer, paint, or wallpaper.
- Use a material-specific cleaner on delicate, unsealed, or specialist surfaces.
- Treat mold as a separate moisture and fungal-growth problem rather than ordinary dirt.
What is this cleaner made from, and why does it work?
Despite the name, the product does not contain table sugar. The name is commonly linked to the crystalline appearance of traditional powdered versions, while modern formulations differ between manufacturers. UK products may contain alkaline cleaning agents such as sodium carbonate, and manufacturers publish safety and ingredient information for individual formulations.
Its main decorating benefit is effective degreasing rather than changing the paint itself. Grease, hand marks, cooking residue, and general grime can leave a surface less suitable for a fresh coating. Cleaning those contaminants away gives you a better starting surface before you repair, sand, prime, or paint.
7 practical uses around a UK home
This cleaner is associated most closely with decorating, but many products are also labelled for broader household cleaning. The suitable jobs depend on the formulation and the material underneath the dirt. Check the label before extending its use to a surface you have not cleaned with it before.
- Preparing painted walls before repainting. It can remove everyday dirt, grease, and marks before the next decorating stage.
- Degreasing kitchen walls and suitable cupboards. Cooking residue can build up around hobs, worktops, handles, and food-preparation areas.
- Washing skirting boards, doors, and painted trim. These areas often collect hand marks, dust, and oily residue.
- Cleaning suitable tiles and enamelled surfaces. Some UK formulations specifically list tiles, baths, basins, and similar hard surfaces.
- Removing smoke and nicotine residue before redecorating. A stronger preparation cleaner may be useful where ordinary washing does not shift the film.
- Cleaning suitable walls after wallpaper removal. Washing can help remove remaining grime and residues before the wall is repaired or redecorated.
- General cleaning on label-approved hard surfaces. Some concentrated and ready-to-use products are marketed for household cleaning as well as decorating preparation.
The fact that one manufacturer approves a use does not automatically make every version suitable for the same job. Powder, concentrate, spray, and wipe formulations can have different strengths and directions. Treat the instructions on your own product as the final guide.
Do you need a strong decorating cleaner?
| Situation | Sensible starting approach |
| Clean, low-traffic wall with light dust | Dust first and use a mild cleaning method if needed. |
| Kitchen wall with greasy residue | Use a suitable degreasing preparation cleaner. |
| Doors or skirting with hand marks | Clean thoroughly before sanding or repainting. |
| Heavy smoke or nicotine staining | Use a cleaner labelled for the contamination and assess whether further stain treatment is needed. |
| Visible mold or mildew | Address the moisture cause and use an appropriate mold treatment. |
| Unsealed or valuable timber | Use a cleaner intended for that finish. |
| Unknown decorative finish | Patch-test or follow the finished manufacturer’s care instructions. |
Using the strongest cleaner available is not automatically better preparation. The aim is to leave the substrate clean, sound, dry, and compatible with the next coating. Choosing the method according to the dirt and the surface reduces unnecessary chemical exposure and lowers the chance of damaging a finish.
How to Use Sugar Soap Before Painting

Start by reading the instructions because dilution ratios can differ considerably between products. Some concentrates are mixed with several liters of water, while ready-to-use sprays and wipes may require no dilution at all. Gather gloves, clean cloths or sponges, buckets where needed, and eye protection before you begin.
- Protect the room. Move furniture away and cover flooring, fabrics, sockets, and anything vulnerable to splashes.
- Remove loose dirt. Dust or vacuum the surface so you are not spreading dry debris through the cleaning solution.
- Dilute exactly as directed. Do not make the mixture stronger because you assume it will clean faster.
- Wash a manageable section. Apply the solution with a sponge or cloth without soaking plaster, joints, or surrounding materials.
- Rinse when the label requires it. Use clean water and a separate cloth or sponge so cleaning residue is removed.
- Let the surface dry completely. Only continue with filling, sanding, priming, painting, or papering when the surface is dry.
Rinsing deserves particular attention because many traditional liquid and powder products instruct users to rinse with clean water. Rustins, for example, directs users to rinse and let the cleaned area dry thoroughly, while rinse-free wipes are also sold for decorating preparation. That difference is another reason to follow the instructions for the exact formulation in your hand.
Which surfaces should you avoid?
Do not assume a product designed for painted walls belongs on every material in the house. Unsealed timber, waxed or oiled finishes, delicate coatings, fabrics, electronic screens, and other moisture-sensitive items need particular care. Natural stone and specialist surfaces should also be cleaned according to their own manufacturer or installer guidance rather than with a general-purpose decorating product.
If you are dealing with hardwood flooring, Readox’s hardwood floor maintenance guide recommends using cleaning products suited to the flooring rather than harsh household chemicals. Visible fungal growth is another separate issue, and the Readox mold-remover guide covers targeted cleaning and moisture-control considerations. Matching the cleaner to the material and the problem is safer than treating one product as a universal solution.
A patch test is useful whenever you are uncertain about a painted or coated finish. Apply a small amount in an inconspicuous location and follow the correct dilution, contact, rinsing, and drying directions. Stop if you notice discolouration, softening, loss of sheen, or another unwanted change.
Safety precautions that matter
Safety guidance varies with the formulation, so the current packaging and safety data should take priority. Some powdered products are classified as capable of causing eye irritation, and prolonged contact may also irritate skin. Gloves are a sensible minimum, while eye protection is particularly useful when washing walls above waist or shoulder height.
Keep the product away from children and pets while you mix, apply, rinse, and store it. Avoid mixing household cleaners together unless the manufacturer explicitly states that the combination is safe. Good ventilation, sensible splash control, and prompt rinsing after accidental contact are simple precautions that make a decorating job safer.
What can you use instead?
For light dirt on a sound wall, warm water with a small amount of suitable mild detergent may be enough. A specialist paint-preparation cleaner can also be an option if its label matches your substrate and coating system. The goal remains the same: remove contamination without leaving a film that causes trouble for the next finish.
White vinegar is useful for some household cleaning jobs, particularly mineral deposits, but it is acidic and unsuitable for several materials. Readox’s guide to cleaning with white vinegar explains where diluted vinegar can help and which surfaces need to be avoided. Do not combine vinegar with another cleaning product as part of an improvised decorating mixture.
The cleaner you choose should match the contamination you are trying to remove. Light dust, greasy cooking film, mold, adhesive residue, and mineral scale are different problems and may need different treatments. A surface-specific method is often a better choice than increasing the strength of a general cleaner.
Common mistakes to avoid
Most problems come from using too much product, skipping part of the preparation, or treating every surface in the same way. Faster preparation is not useful if it leaves residue, traps moisture, or damages the coating underneath. A few simple checks can prevent a minor cleaning job from turning into extra repair work.
- Mixing a concentrate stronger than the stated ratio.
- Skipping rinsing when the manufacturer instructs you to rinse.
- Painting while the wall still feels damp or cool from cleaning.
- Allowing liquid to flood sockets, joints, timber edges, or damaged plaster.
- Scrubbing a delicate finish before performing a patch test.
- Assuming a ready-to-use spray has the same directions as a concentrate.
- Using an ordinary surface cleaner as the only treatment for a mold problem.
Get the surface right before you decorate
Good decorating starts with identifying what is on the surface and removing it without causing fresh damage. Choose a cleaner suited to the material, follow its label, rinse where required, and give the wall enough time to dry. Once the preparation is complete, you can explore Readox’s light beige paint color ideas or browse Home Improvement for the next stage of your project.
Conclusion
Sugar soap can be a useful part of decorating preparation when walls, doors, skirting boards, cupboards, tiles, or other suitable surfaces have accumulated grease, grime, fingerprints, smoke residue, or everyday dirt. Its main purpose is to create a cleaner surface so that filling, priming, painting, or wallpapering can be carried out on a better-prepared substrate. However, stronger cleaning does not always mean better results, and the product should not be treated as a universal cleaner.
The safest approach is to choose a formulation designed for the surface you are cleaning, follow the manufacturer’s dilution and application instructions, protect yourself from splashes, and patch-test unfamiliar finishes.
Frequently Asked Questions
Many traditional concentrates and powders should be rinsed with clean water after use, especially when the surface will be painted. Some modern wipes or specialist formulations are designed to be rinse-free, so the instructions on the package remain important. Once any required rinsing is finished, allow the area to dry fully before decorating.
It is normally intended to clean sound paintwork rather than strip the entire coating. Aggressive rubbing, excessive concentration, or use on a weak finish may still affect the surface. If the existing paint is flaking, chalky, soft, or poorly bonded, deal with that coating problem before repainting.
Many formulations are sold specifically for cleaning painted surfaces before repainting. The paint still needs to be sound and compatible with the product, so a small test area is wise on older or unusual finishes. Use a soft cloth or sponge and avoid saturating the wall.
There is no single drying time that suits every room because temperature, ventilation, humidity, and how wet the wall became all matter. The practical rule is to wait until the surface is completely dry rather than relying only on the clock. Screwfix notes that drying may take several hours and can extend to a day in some conditions.
No single cleaner is essential for every wall. A clean, dry, low-traffic surface may need little more than dust removal and appropriate light cleaning, while a greasy kitchen wall may benefit from stronger degreasing. Follow the preparation advice supplied with your chosen paint, primer, wallpaper, or adhesive.